Beyond the Norm: Decoding Unai Emery's Innovative Defensive Strategies at Aston Villa
Unveiling Unai Emery's Strategic Shift: A Detailed Analysis of Aston Villa's Fresh Defensive Tactics in the New Season

At the first two games of the season, as I settled in to watch the opening fixtures of the Premier League, my attention was drawn to someting unusual on the pitch. Aston Villa, under the guidance of Unai Emery, were defending with a distinctiveness that set them apart.
Despite their loss in the first game against Newcastle, it was not merely the routine mid-press phase; it was a calculated deviation from the norm. The defensive line stood remarkably high, leading to a persistent question: why were they adopting such a daring approach? The details of their defensive maneuvers, especially in the mid-press and high-press, left me curious.
“To be honest with you, I watched Aston Villa and I can’t believe the scoreline, Honestly Aston Villa played fantastic football and just lost to bad goals” said Sir Alex Ferguson when asked to name the side that had impressed him the most during the Premier League’s opening weekend
As the season progressed, my interest changed into a journey. I started exploring the mystery behind Aston Villa's unusual defensive strategies. Match after match, I followed their every move, and trying to understand the method behind the confusing occurrences. What was initially a puzzling occurrence slowly revealed into an engaging story of strategic development

Football is a dynamic sport, and as we explore the details of Aston Villa's defensive strategies, it becomes evident that innovation is the heartbeat of the beautiful game. It's a testament to the adaptability and creativity embedded in the sport's DNA. Teams, much like living organisms, develop and adjust to their surroundings, constantly searching for new ways to outsmart their opponents.
Melding the High Line of High Press with the Compactness of the Low Block
First, let's examine how Aston Villa usually defended in a Mid-Press phase.
In their previous campaign, Aston Villa's Mid-Press in a 4-4-2 was marked by a calculated depth, strategically managing defensive lines to control and restrict opponent movements.
But let's move beyond descriptions and witness the on-field application of their new approach.
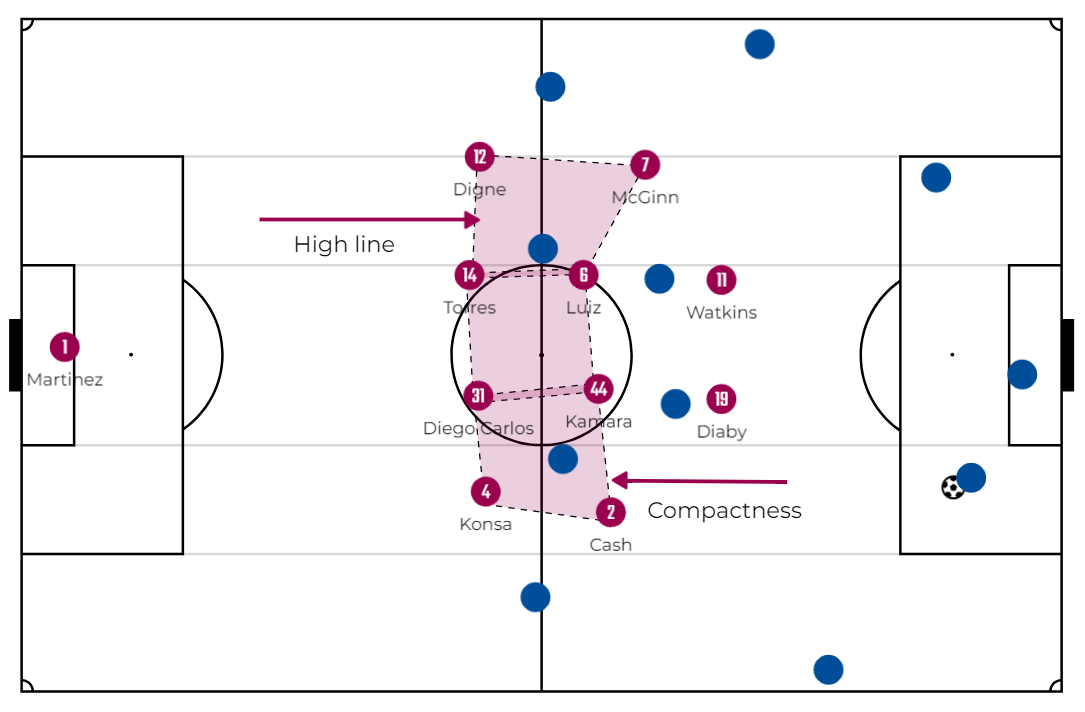
Using the same 4-4-2, the introduction of a high line serves as a catalyst for the team to seamlessly transition into a higher press, enabling players to press opponents aggressively and minimizing their reaction time. We've seen similar applications in notable instances like Saudi Arabia's Mid-Press against Argentina in the World Cup 2022.
This adjustment makes it easier for the defensive unit to swiftly engage in pressing. However, it comes with a persistent challenge—the vulnerability to the vast space left behind the defensive line. The weakness in this space is exacerbated by the absence of pressure on the ball. Without immediate pressure on the ball carrier, the expansive area behind the defensive line becomes a potential area of risk.
But before, let’s talk about the advantages between the lines.
The two forwards and two central midfielders work together like a cage against the opposing midfielders. This setup makes it tough for the opponents to find spaces and connect passes.
With very narrow lines, it becomes difficult for the opposing team to locate the forward or the number 10 player between the lines. The compact defensive setup restricts spaces and makes it challenging for the opponents to find key players in dangerous positions.
So what about the spaces in behind, that’s the major problem of that system.
What really went down was, when they guided the play to one side, they immediately pressed and covered shadows on all possible passing options. This left the opponents with no good passes to make, shutting down their passing choices.
Now the opponent is left with no option but to attempt a pass behind the defensive line. This triggers the defensive line to step up, utilizing the offside rule to defend that area behind them. It might seem like a risky strategy, and in many ways, it is. However, it has shown some effectiveness in disrupting opponents.
and it’s not only against the balls from the wide areas. It could happen also against the open balls from central channels.
The disallowed goal against Arsenal showcased the calculated risk taken by the Spanish coach. Notably, Lucas Digne and Pau Torres stepped up to apply the offside trap against the pass played in behind. With the inherent risk of employing a high defensive line, the success of the offside trap relies on impeccable timing—a daring move by the Spaniard.
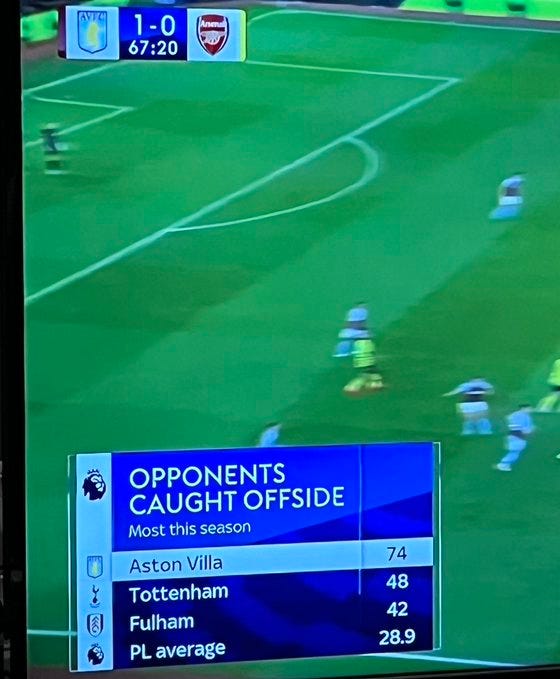
I never thought there'd be a day when an offside statistic would be crucial, but this one truly holds significance.
One other important aspect, is how they are controlling the inside channels.
It's noteworthy how the defenders shaped their bodies towards the inside channel, maintaining control over any potential inside pass. This minimizes the chances of passes behind them landing in significant areas, showcasing a strategic defensive awareness.
The same happen if the ball was in the central channel.
If we look back at Unai Emery's training methods during his time at Villarreal, it's evident how he coached his players to adopt the inside body shape, prioritizing control of the inside channel while also emphasizing awareness of opponents behind them.
Observing closely, you can now see how each detail plays a crucial role in influencing the new approach. The body shapes of the defenders contribute significantly to defending both direct passes and passes played behind the defensive line.
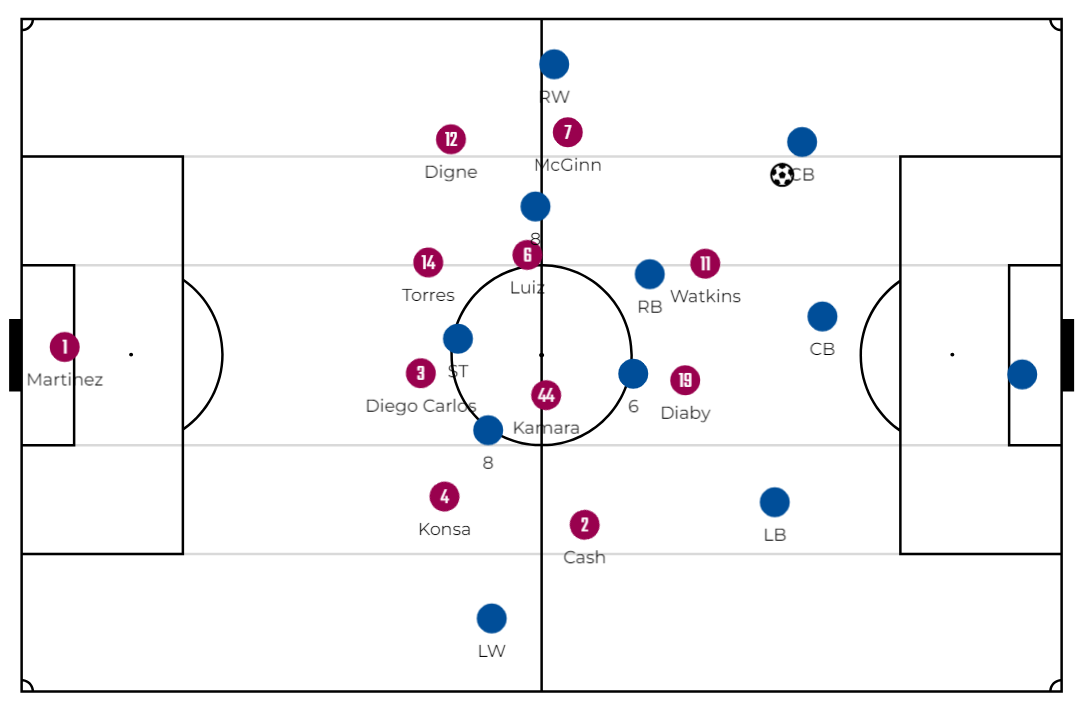
Now moving to the High-Press, it's essential to integrate it seamlessly rather than discussing it as a separate context. The High-Press is strategically deployed in conjunction with back-pass triggers, facilitating a smooth transition from the mid to the high press, or it’s initiated against the Goal-Kicks from the start.
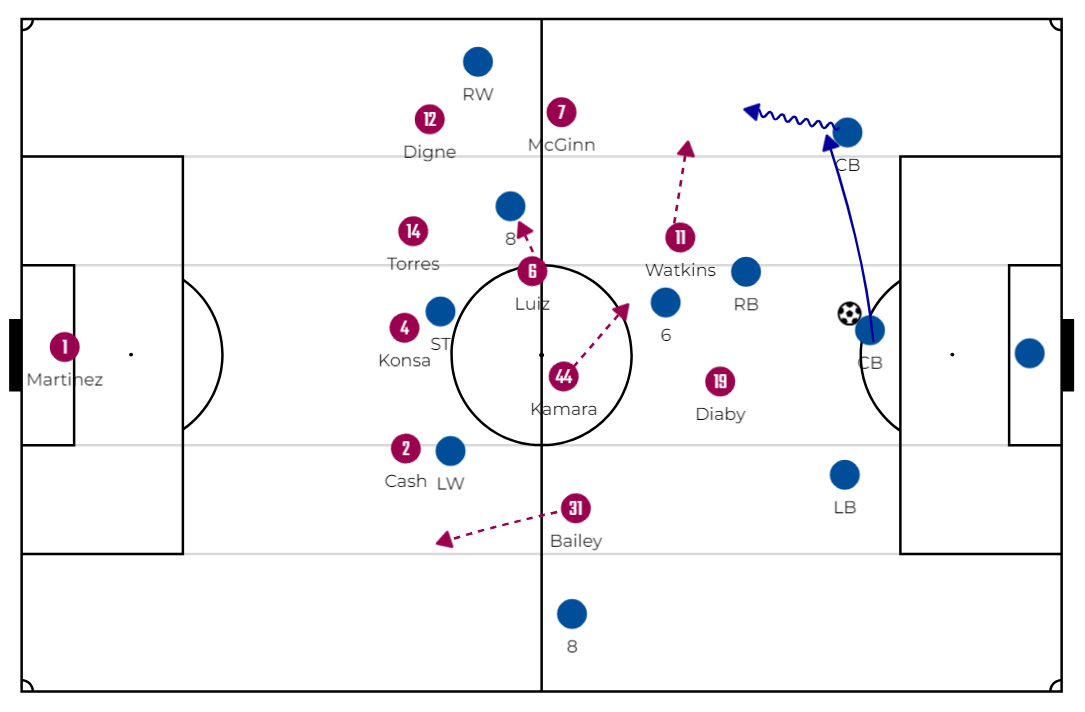
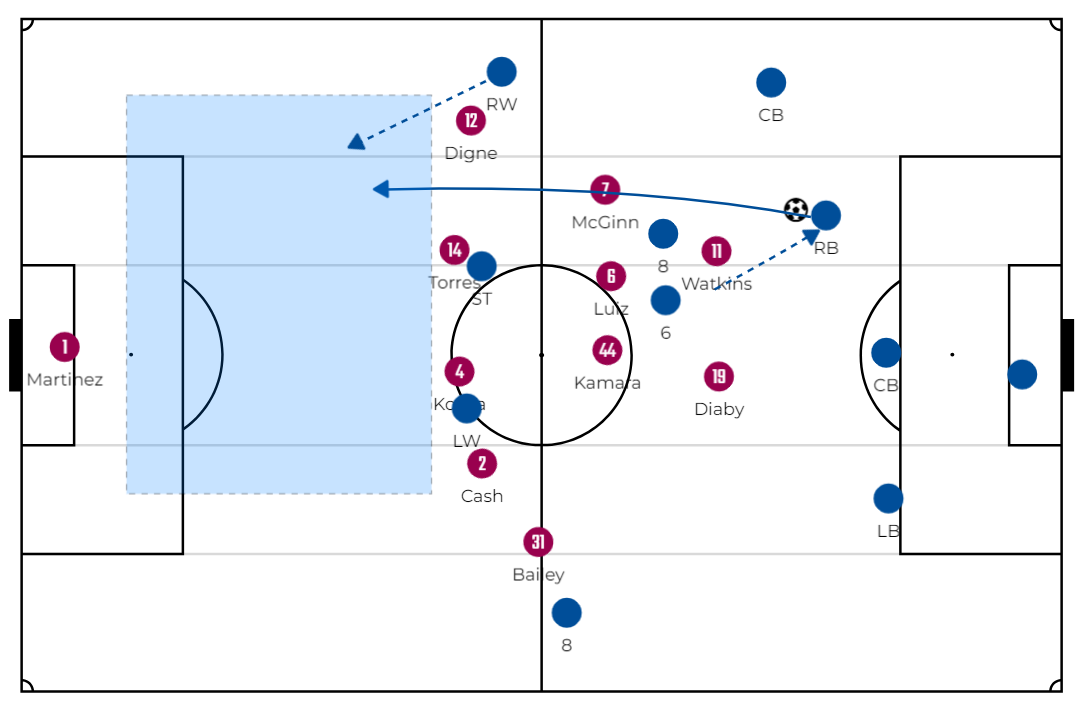
Facing a team with two midfielders or double pivots in the build-up, Luiz positions himself between them. Once the ball is directed to one of the sides, he moves towards the near-side midfielder. A key aspect of this scheme is the far winger's role in narrowing off to the far midfielder, effectively engaging to the side of the play.
Disrupting Highly Organized Build-Up Structures
Facing a formidable team like Brighton, renowned for their impressive build-up phase, Aston Villa opted for a proactive approach. Instead of adhering to their usual mid-press strategy, they frequently transitioned to a high press. Contrary to their typical approach, they seized every opportune moment to escalate into a high press.
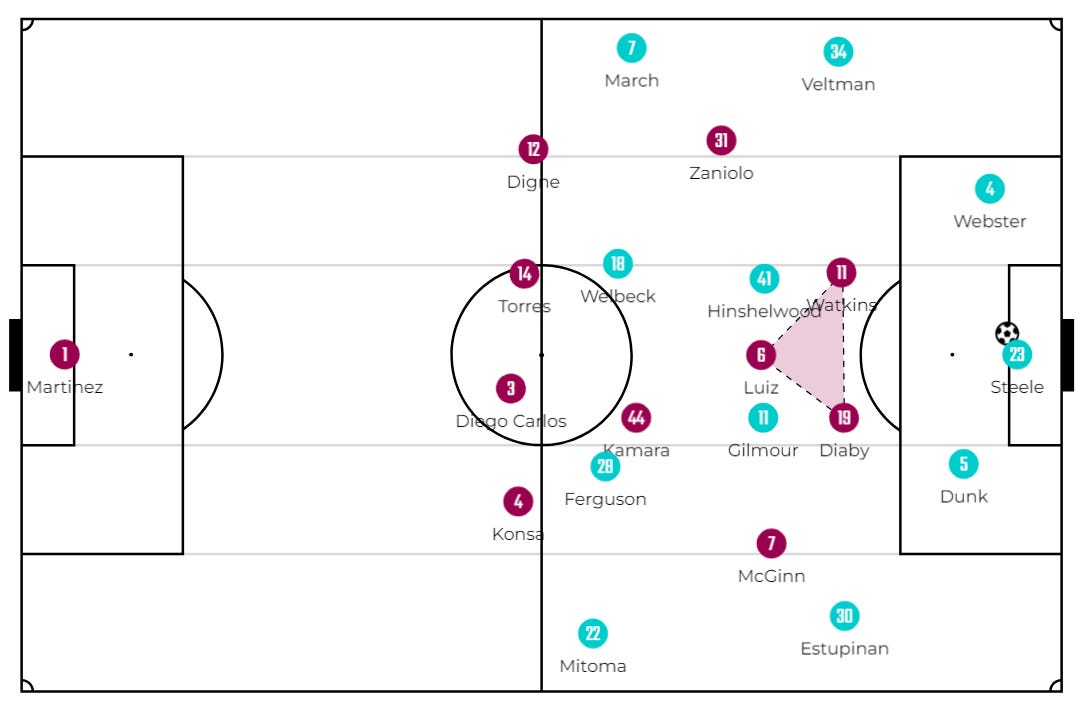
Adopting a similar structural approach to what Man United employed against Brighton, Aston Villa customized the 2-1 dynamic triangle to align with their pressing strategy. With Luiz strategically positioned between the opposition's midfield pivots, the forwards adeptly covered shadows.
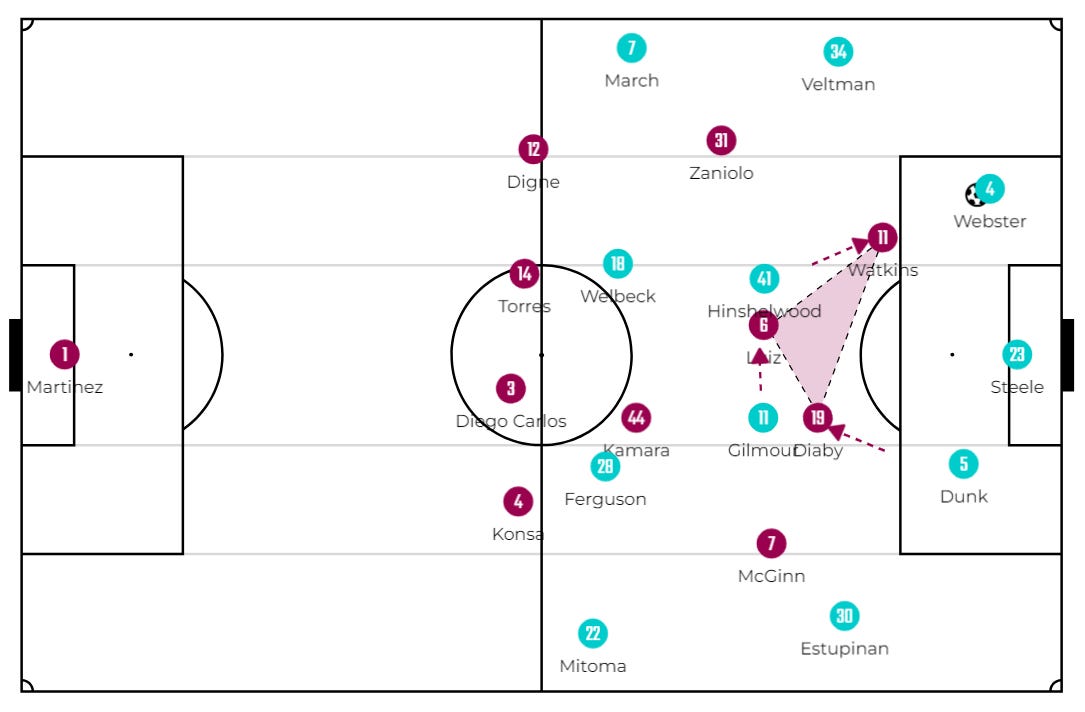
When the ball goes to one of the sides, the near FW applies pressure on the CB, Luiz moves towards the nearby 6er, and the far forward engages with the other 6er.
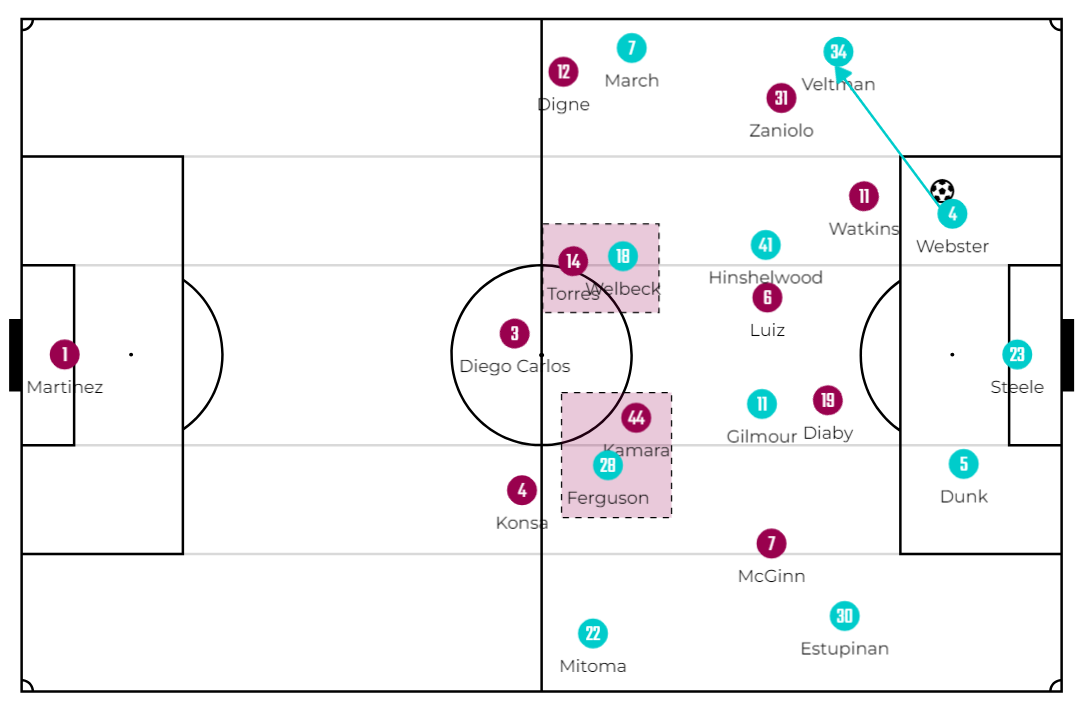
Following this sequence, Kamara effectively marked one of the dropping FWs from the opponent. In this scenario, Aston Villa displayed confidence, especially on the left side, allowing Pau Torres, the CB, to step up and press the other FW.
With the narrow positioning of the 6ers, Aston Villa chose not to use the far winger to press the far 6er. However, the far winger still played a crucial role. In the previous example, observe how the far winger tracked back to mark Brighton's far FW, effectively pushing Pau Torres back into the defensive back line.
Strategies Against Inverted Full-Back Formations
Another prevalent tactical trend widely used in the Premier League—how did Aston Villa respond to this idea with their defensive approach?
Both FWs of Aston Villa reacted similarly, considering the inverted FB, who now acts as a second pivot. Personally, I refrain from categorizing the entire system as strictly zonal or man-marking. I believe the system is more complex than a single term can capture, especially at such a high level. The other 8 players are positioned between the opposing 6ers and wingers of Aston Villa, with shared defensive responsibilities among them.

Aston Villa demonstrated a mastery of cover shadow tactics—readily jumping on one player while effectively cover-shadowing another. The team's ability to consistently execute these maneuvers and disrupt the opponents was truly magnificent.
That shape enabled them to press the ball while maintaining control over most passing options. They excelled at closing down plays in between, but the risk remained in plays behind the defensive line. With limited passing options, opponents could attempt to exploit the space behind the defense.
With the fullback dropping back into his position, a potential issue arises when the passer is Trent Alexander-Arnold, and the recipient is Mohamed Salah.
The problem unfolds as Arnold, by feigning the pass, causes the defensive line to move backward, while Salah, arriving slightly late, positions himself onside once the ball is played, ultimately scoring the second goal for Liverpool.
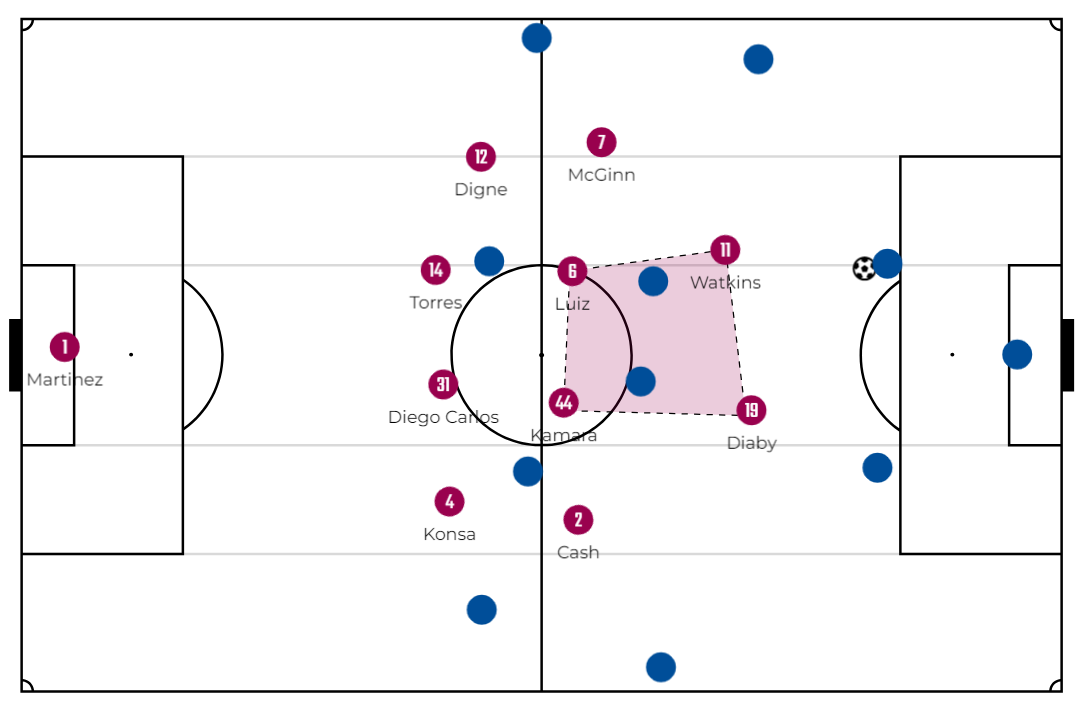
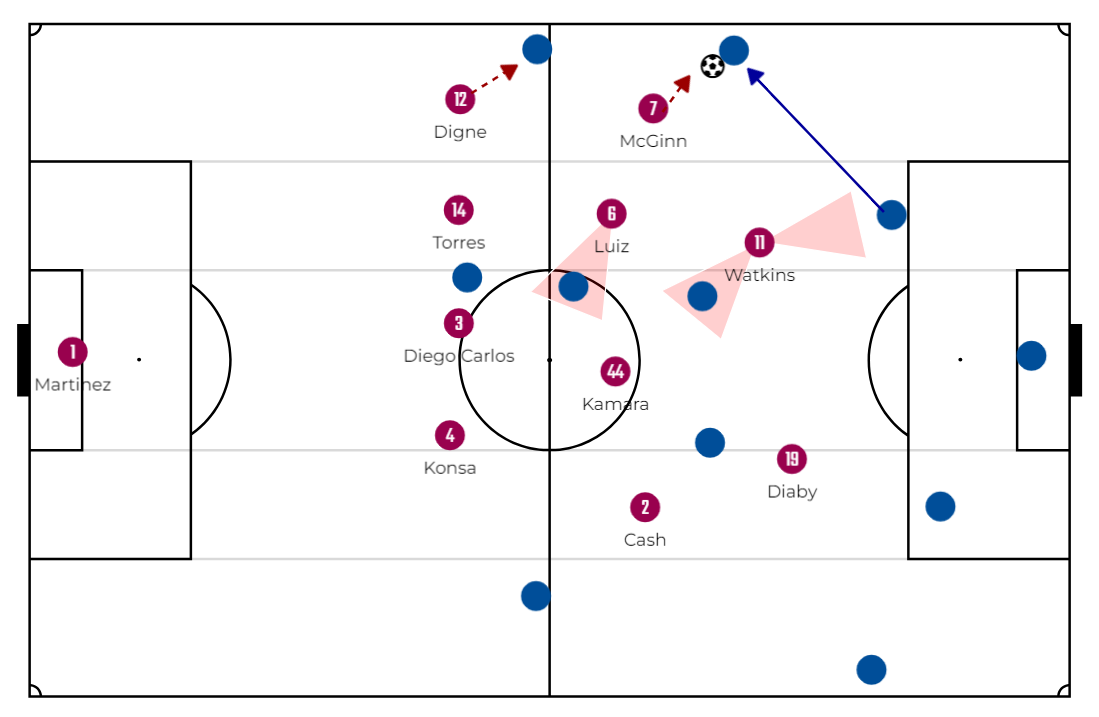
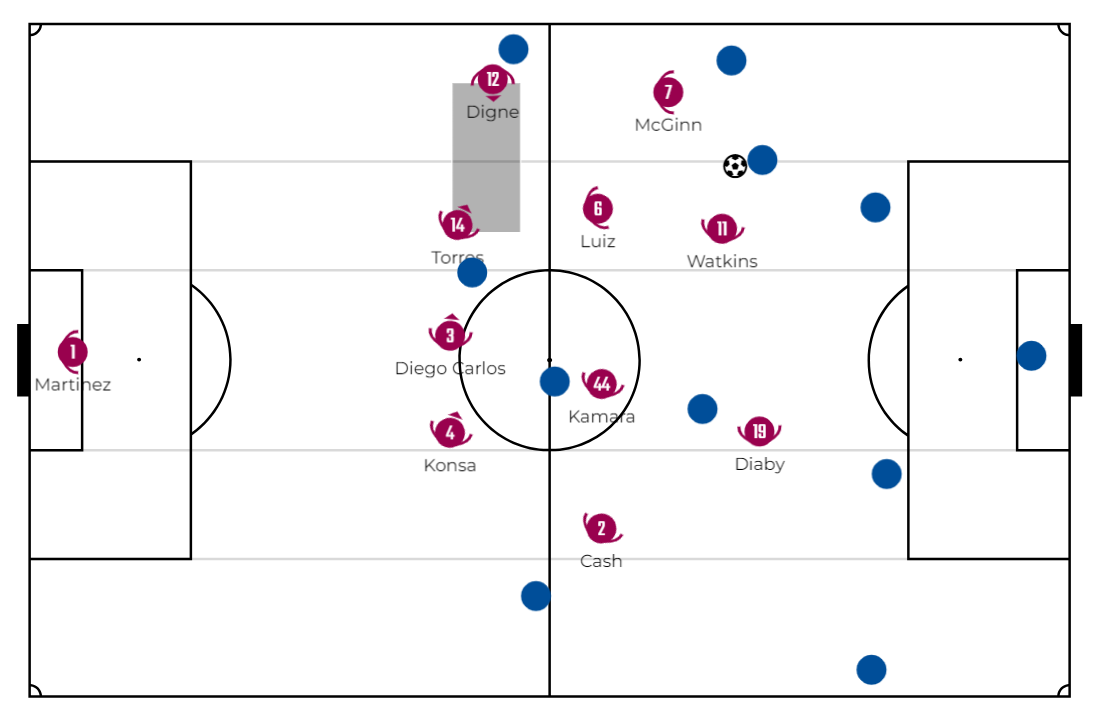
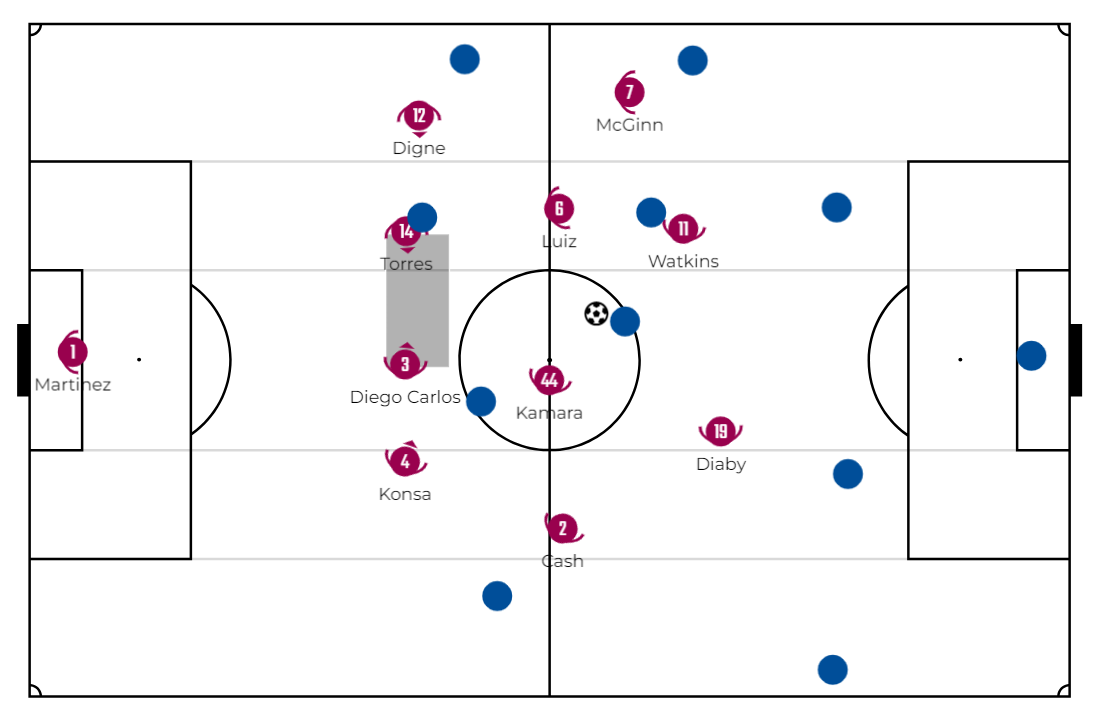
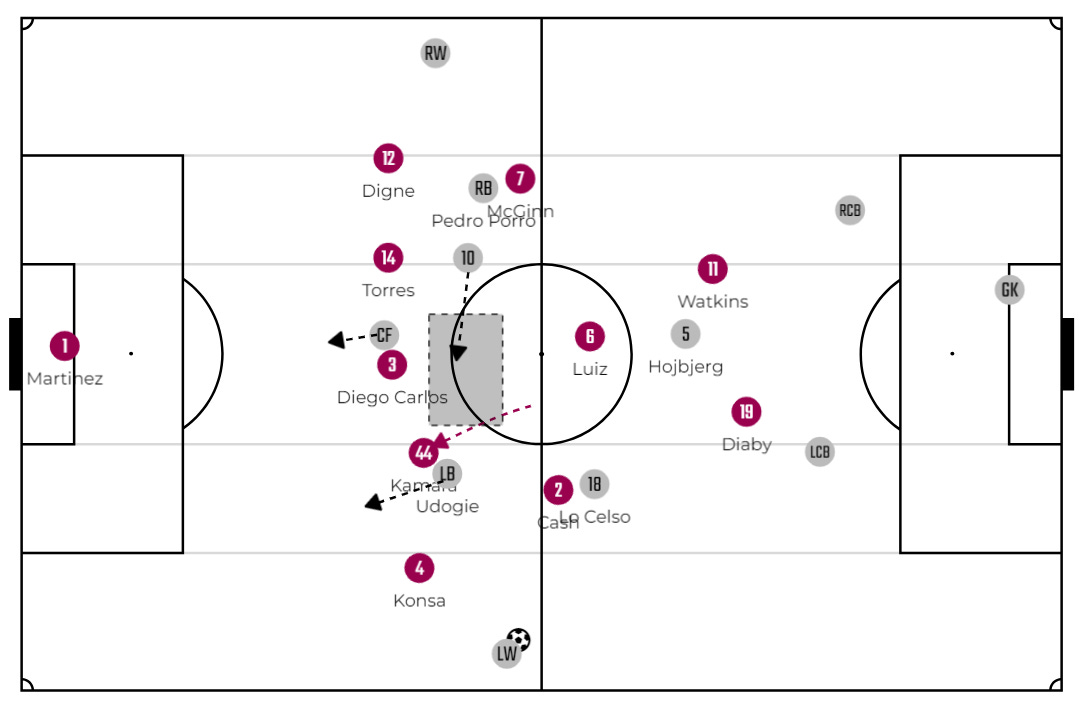
Tactical Approaches Against Dynamic Midfield Lines
How does Aston Villa contend with dynamic midfield lines, such as those employed by teams like Tottenham? In this setup, Tottenham utilizes two inverted fullbacks, not just one. The midfield consists of two 6ers and a 10, all positioned between the lines. What sets this apart is the flexibility of movement, allowing players to roam rather than adhere to fixed positions.
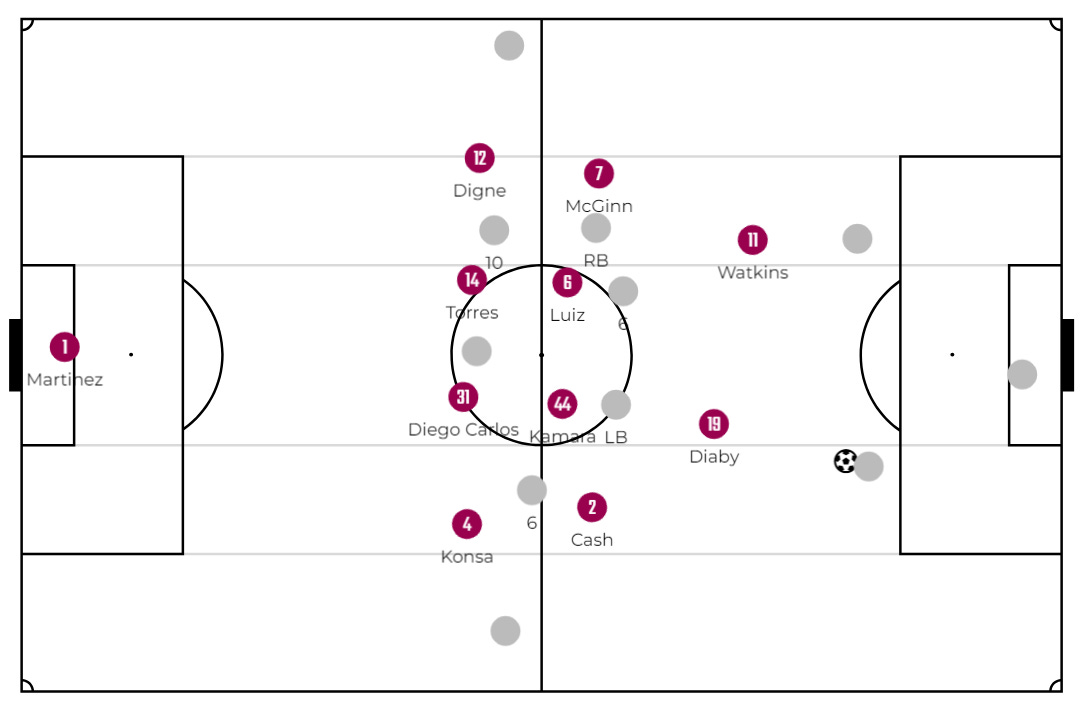
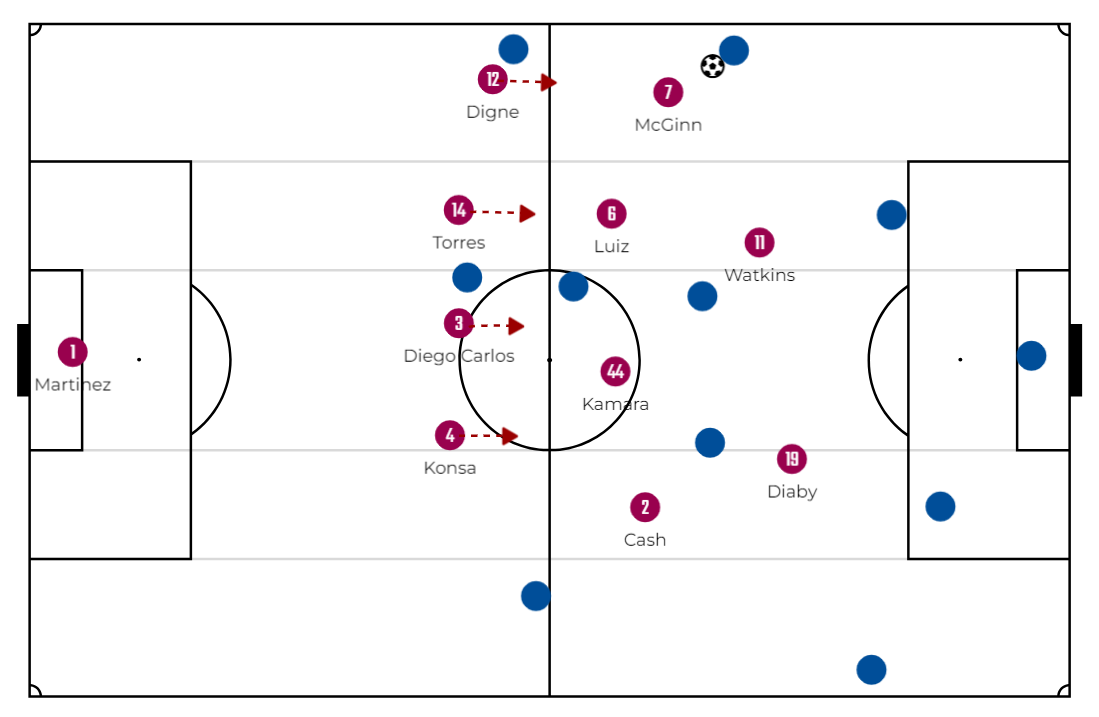
With their players consistently positioned between the lines, Aston Villa's compact defensive structure posed challenges for Tottenham in the midfield. The tight organization disrupted Tottenham's attempts to navigate through the central areas.
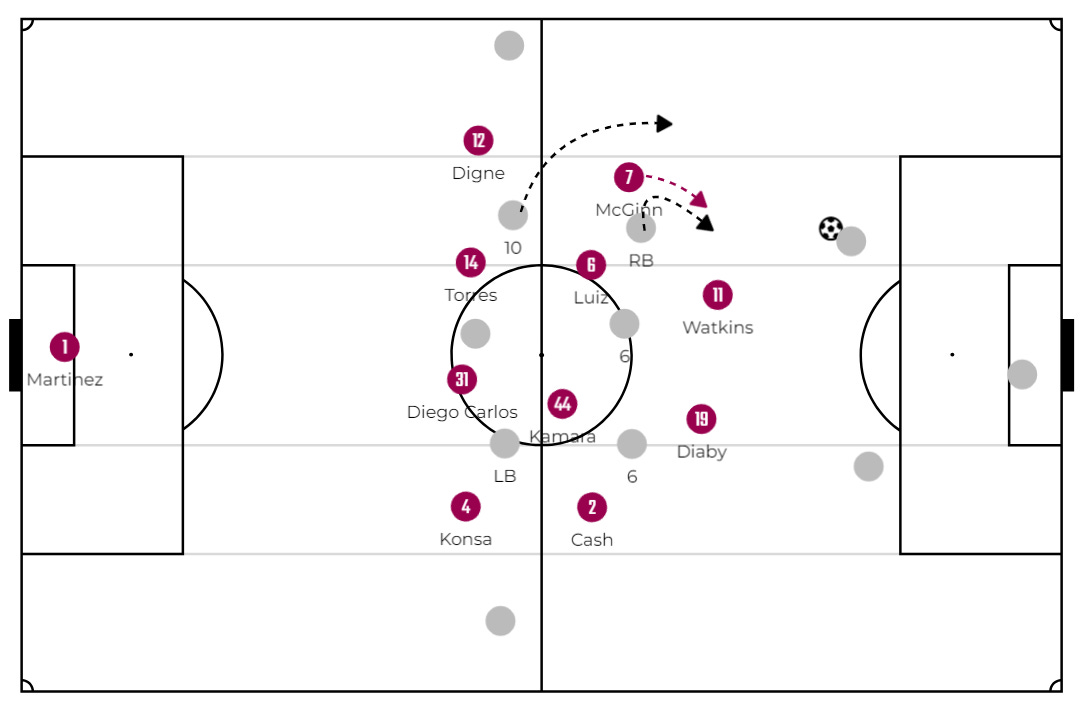
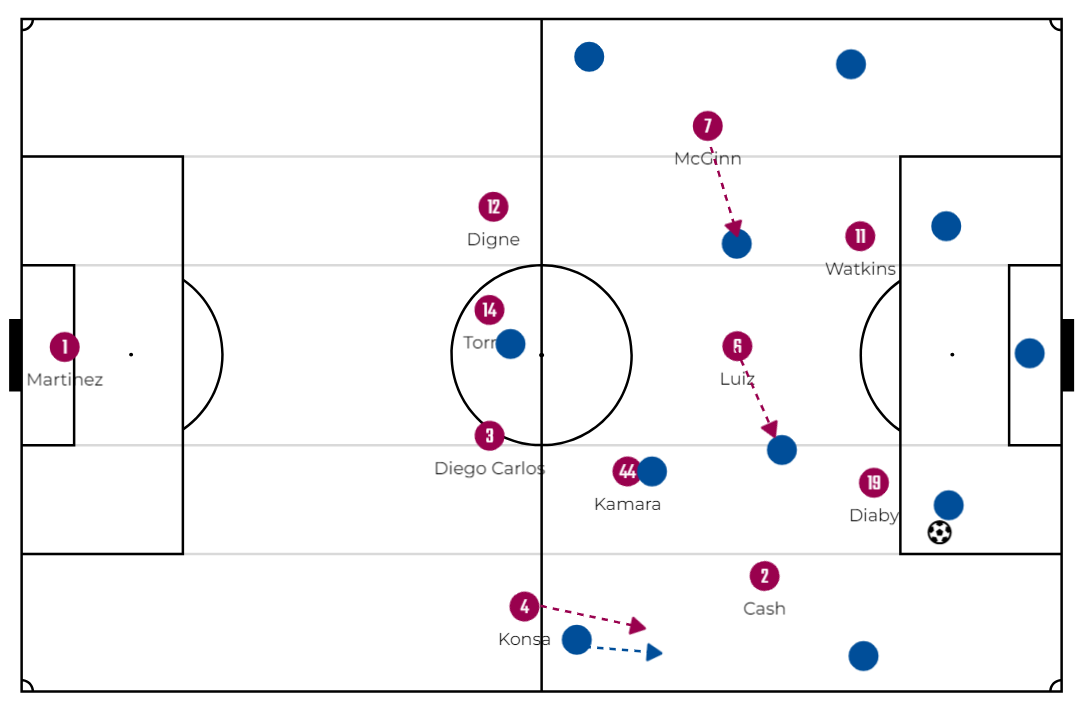
Tottenham started to double up against one player. They used the right back to engage with McGinn, creating an opportunity to find the number 10 positioned behind him.
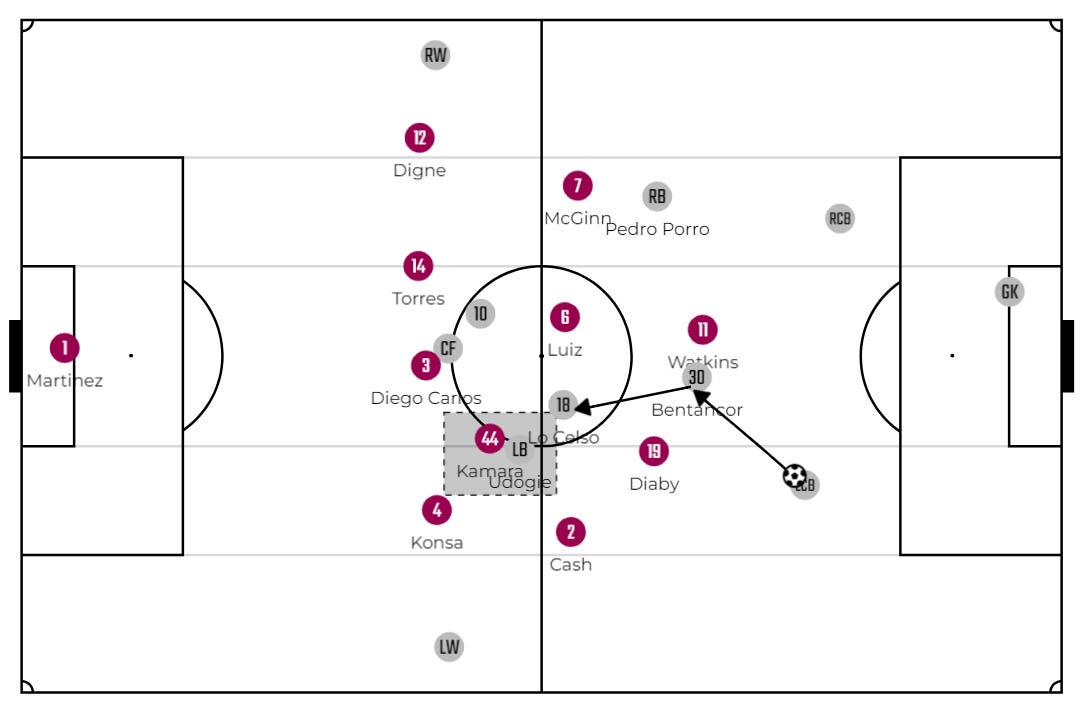
That's a concept similar to the double-up strategy, overloading against one or two players of Aston Villa. Observe how Udogie pinned Kamara, providing Lo Celso with the necessary time to receive the ball
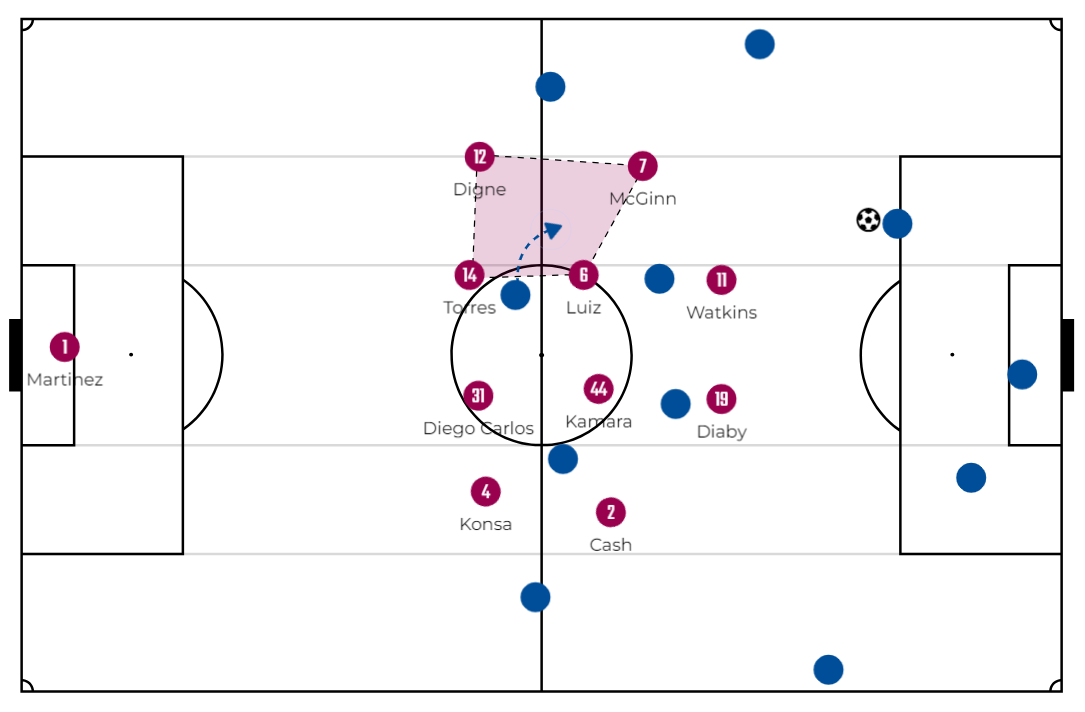
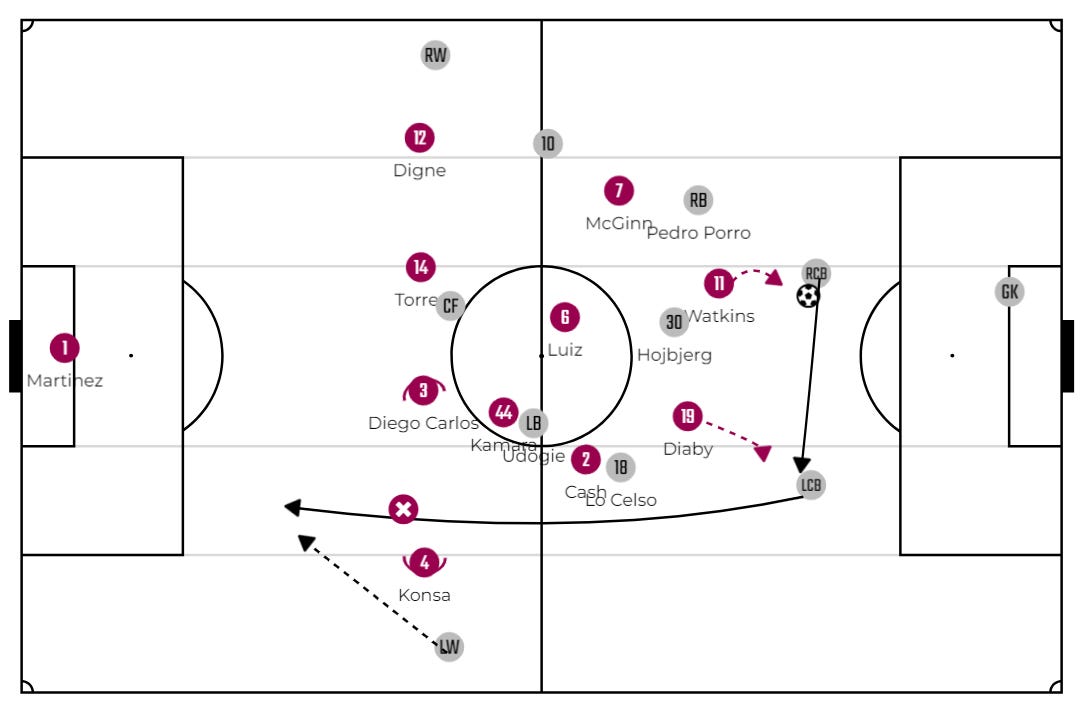
In response to Aston Villa's compact defensive block, Tottenham opted to withdraw one of their players from the block, providing an additional passing option beneath the defensive structure.
An exceptionally innovative approach against that pressing method occurred when Udogie made a run behind, effectively attracting Kamara. This strategic move created a vacant space for the number 10 (Kulusevski) to receive between the lines and launch an attack on the back line.
Despite the effective solutions Tottenham found, I believe they stand out as the team with the most adept responses faced by Aston Villa. Nevertheless, Aston Villa managed to trap them, utilising the body shapes of the defenders to control the spaces between the CB and the FB.
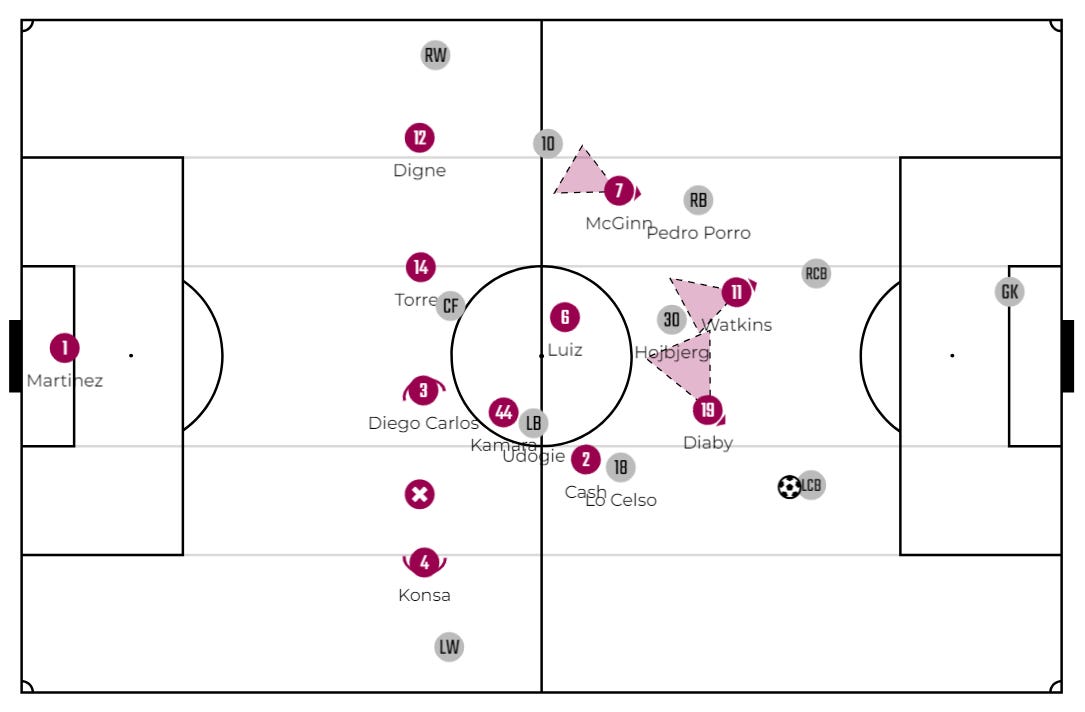
Once again, it's impressive to witness how Aston Villa utilized the cover shadow technique; consistently jumping to press the ball carrier whilst covering in his shadow another Tottenham’s player.

They displayed remarkable dynamism against a highly flexible team. Aston Villa's ability to move dynamically, with each player seamlessly alternating between pressing and covering simultaneously, showcased their exceptional control over the interior spaces on the field.
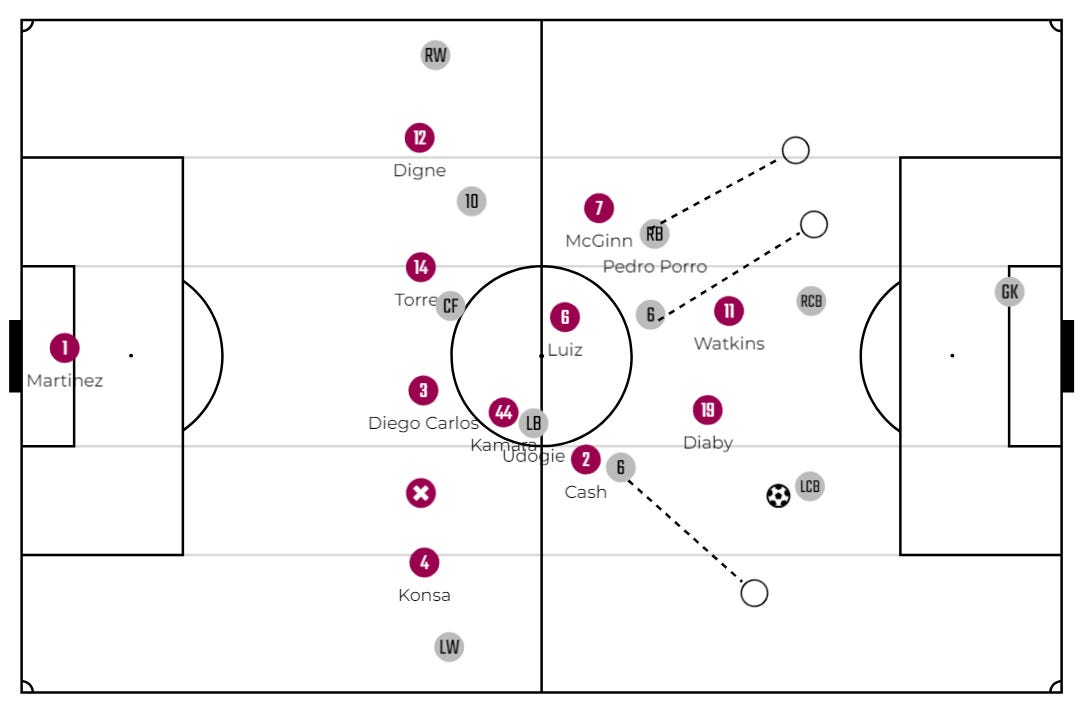
"Now that we've explored Tottenham's strategic solutions for plays between the lines, did they also attempt to exploit passes in behind Aston Villa's defense?

Of course, they attempted to exploit passes in behind. The significant number of players positioned between the lines provided them with multiple options.

For instance, we observed how Son, initially the target, drew the center-backs with him, creating space for Udogie to attack the area between the center-back and the right-back.
Tottenham's ability to find solutions against various situations was truly impressive. Their adaptability and strategic prowess were evident in navigating and countering different scenarios throughout the game.
Mastering the Giants
Aston Villa faced a formidable challenge with back-to-back games against two giants of the past season, Manchester City and Arsenal. In these highly anticipated encounters, Aston Villa delivered a historic performance by securing victories in both games. Let's explore the tactical brilliance and strategic decisions that underpinned their extraordinary success against these formidable opponents.
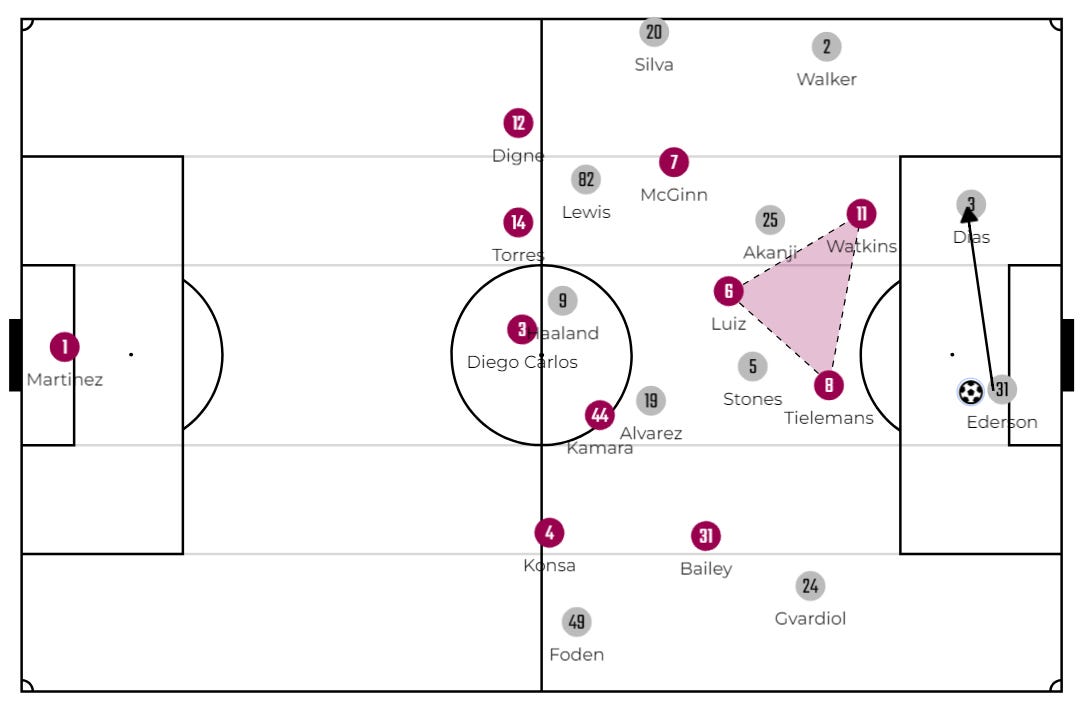
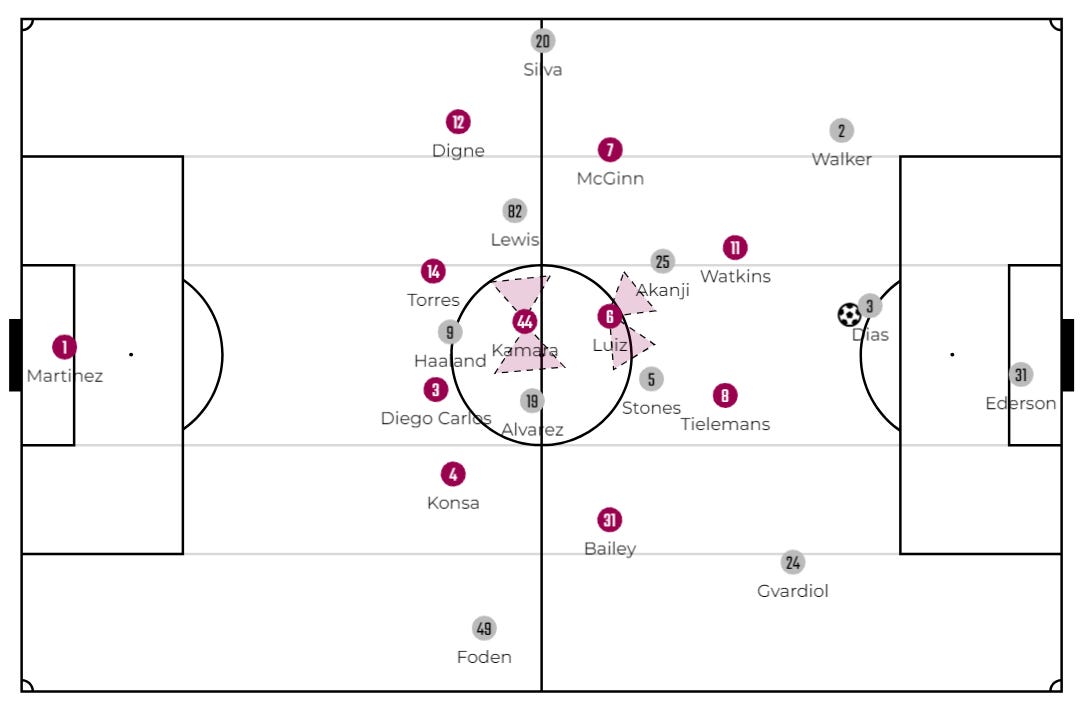
Recall the dynamic 2-1 triangle observed in the Brighton game; a similar approach was employed against Manchester City. Facing the dual pivots of Man City, mirroring the setup encountered against Brighton, Aston Villa leaned heavily on the high press phase to disrupt their opponent's build-up play.
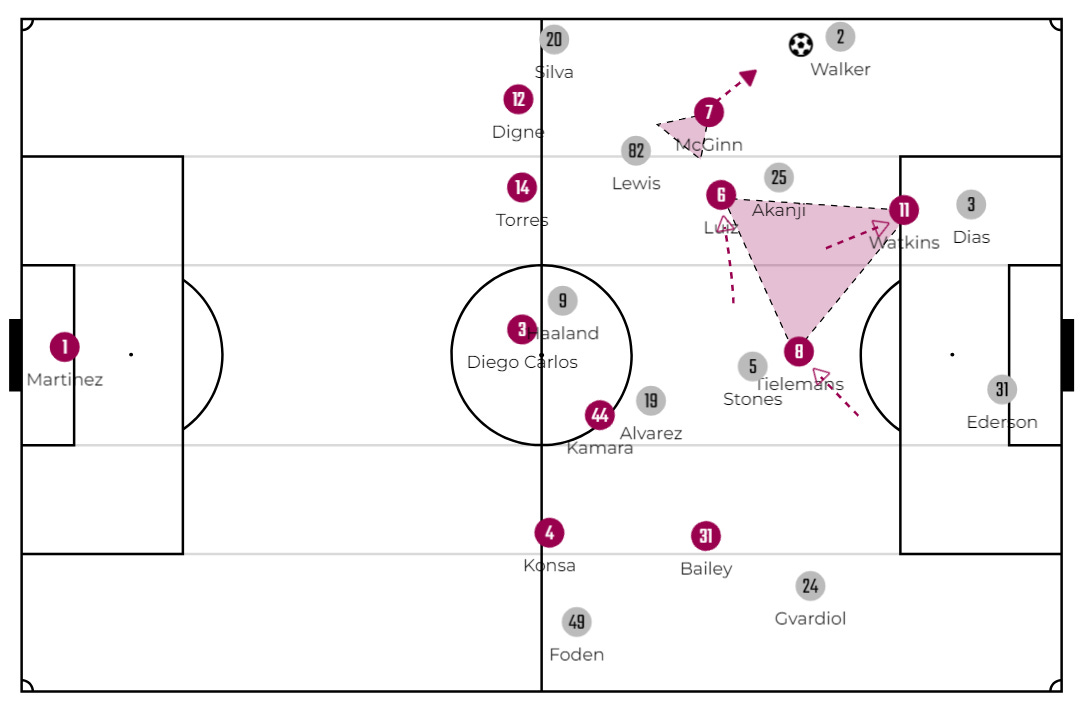
Despite the persistence of the familiar 2-1 triangle, Aston Villa's wingers were given the freedom to press the outer CBs of City, namely Walker and Gavrdiol.
During goal kicks, Luiz frequently positioned himself between the double pivot. However, in open play phases, his focus shifted, particularly towards City's right 8er, Lewis. Depending on the FWs to cover shadow the opposing 6ers in their back.
The implementation of the dynamic triangle not only disrupted City's build-up but also facilitated effective transitions for Aston Villa.
Now, let's delve into how Aston Villa executed their beloved Mid-Press.
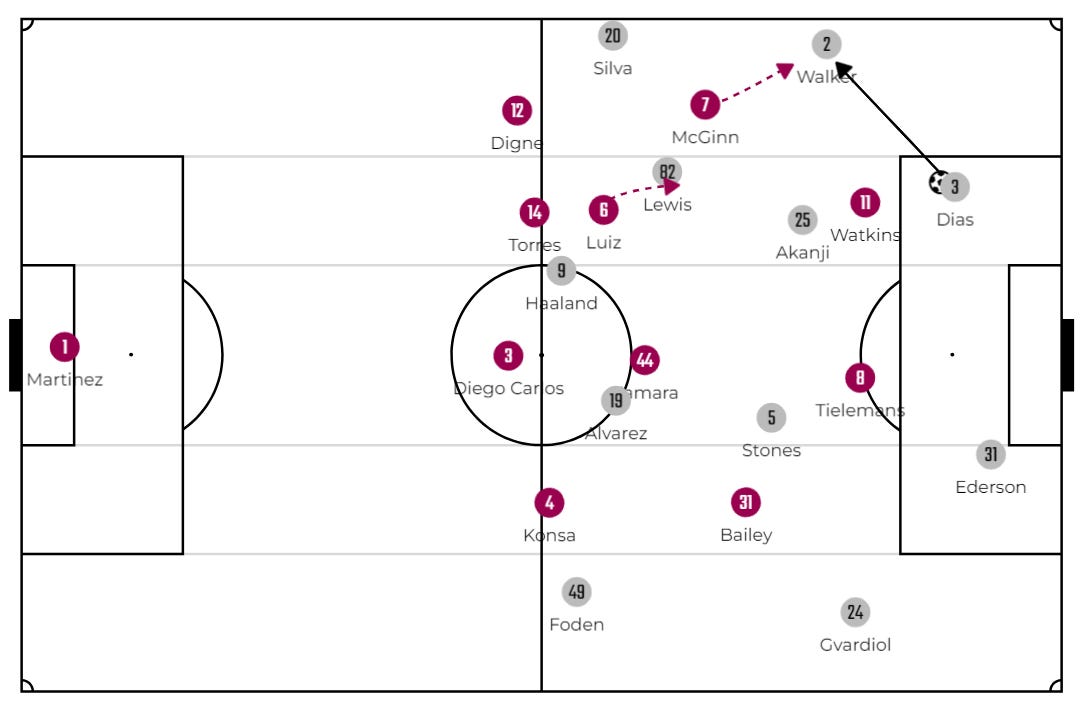
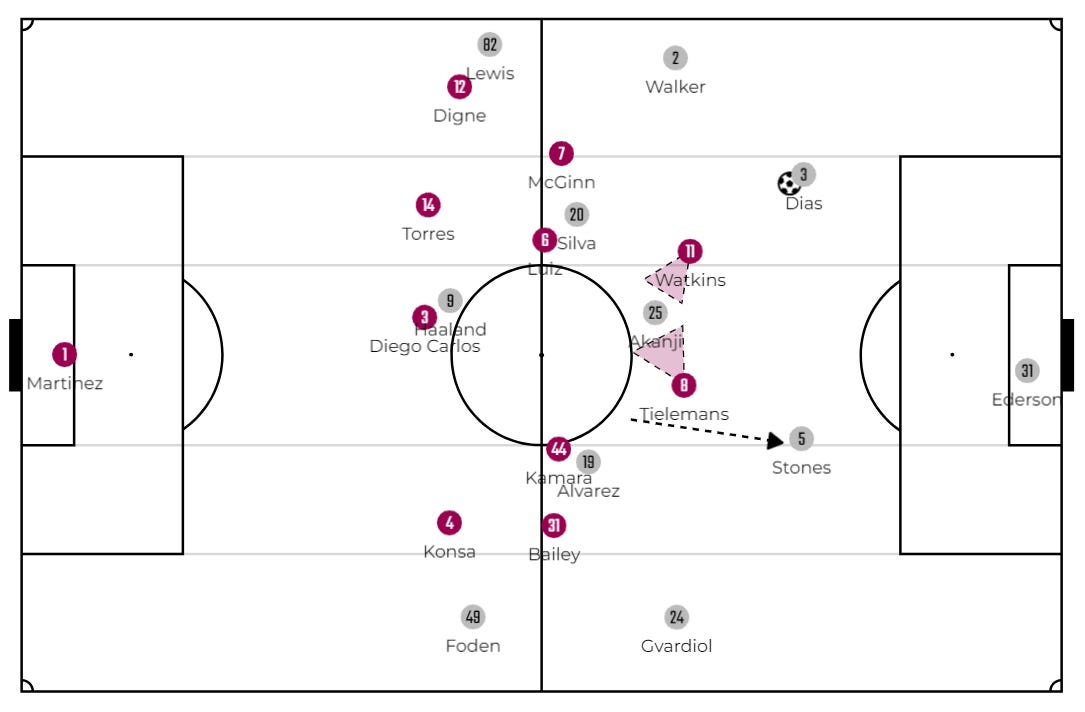
The initial shape involved both midfielders aligning on the same line, providing access to both the opposing 6ers and 8ers of Man City.
The second shape emerged when Aston Villa deployed Luiz in a higher line, with one of the wingers tasked to cover the opposing 8er.
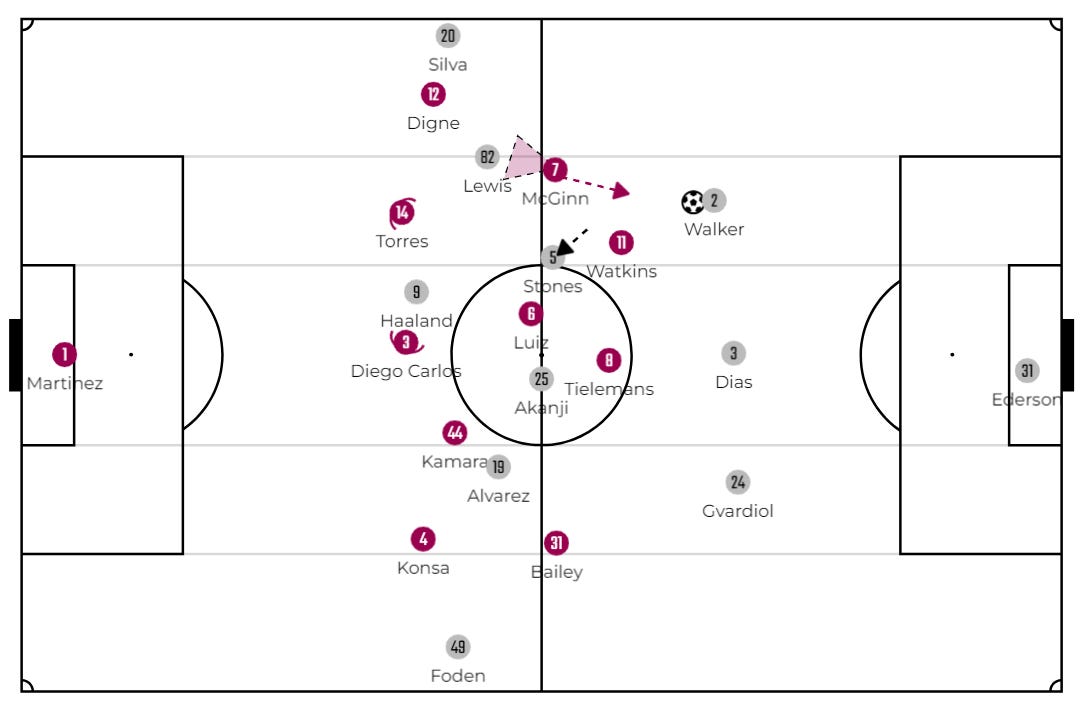
The deep positioning of Stones drew Watkins with him. Consequently, McGinn swiftly jumped to press Walker, with Lewis positioned in his cover shadow.
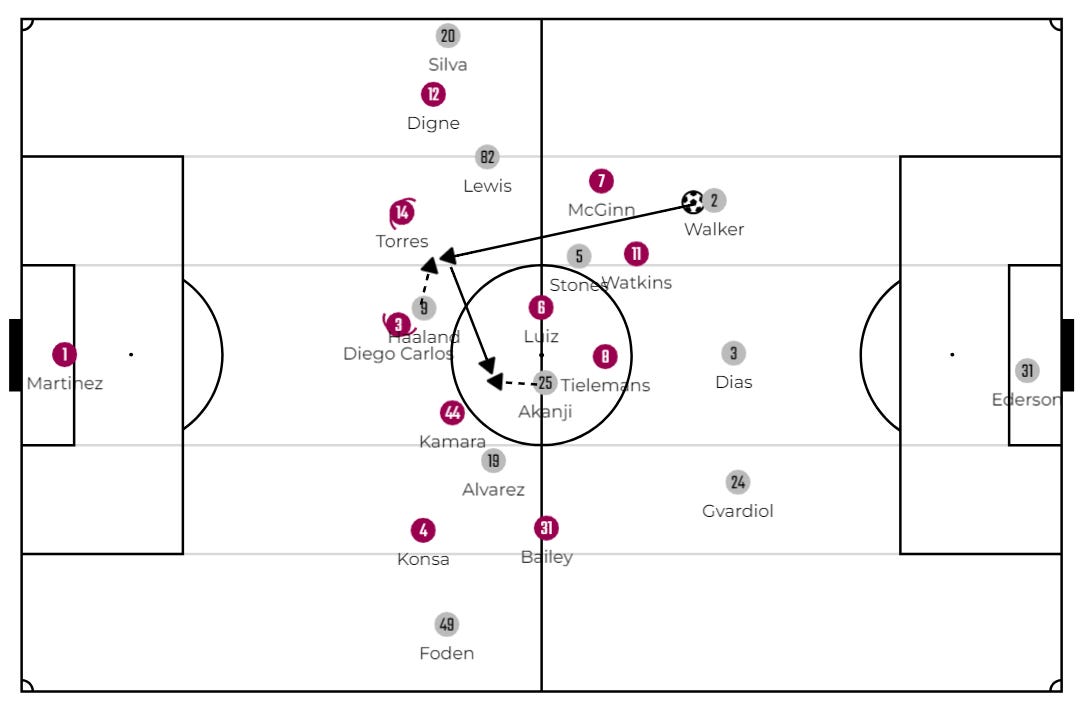
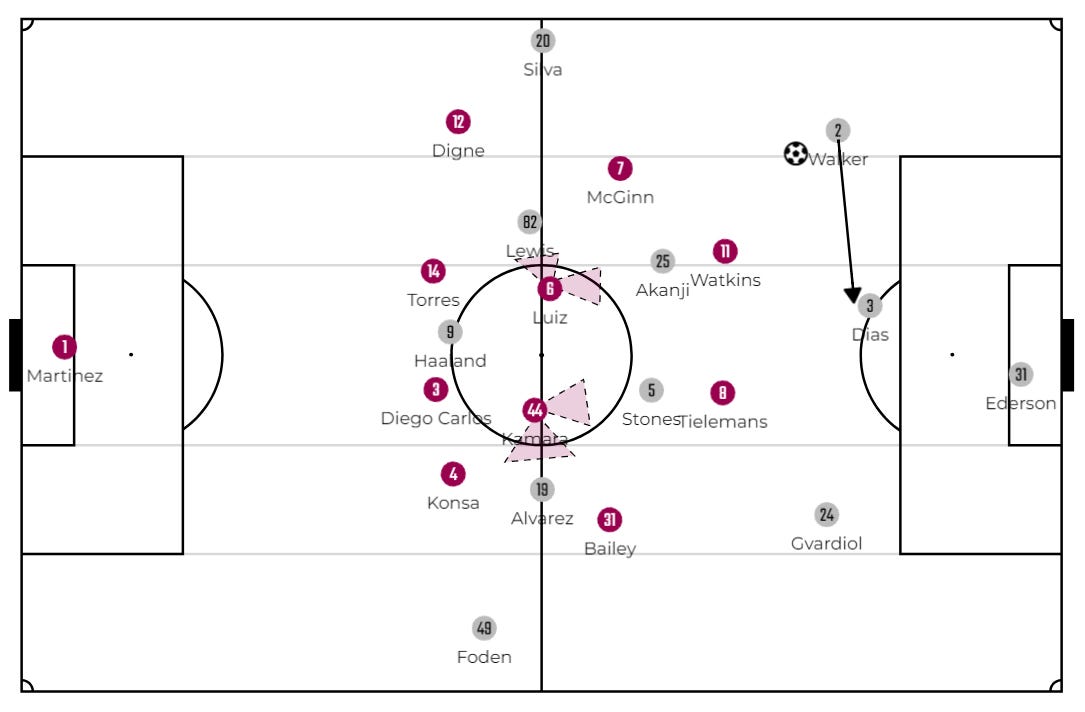
Before McGinn could arrive, Walker passed the ball to Haaland, who laid it off to Akanji. However, Aston Villa's compact defensive structure proved effective, preventing City from successfully escaping the press.
Interestingly, Man City persisted in playing between the lines, a strategy that worked in favor of Aston Villa. The latter was adept at efficiently closing down passing options in between, and Man City did not exhibit the same level of flexibility that, for instance, Tottenham displayed. Surprisingly, City also failed to capitalize on Haaland's exceptional ability to make runs in behind, leaving a notable opportunity unexploited
In the second half, Man City shifted Stones to a traditional center-back role, providing City with an extra passing option at the back. While this allowed for more ball circulation and additional time on the ball, the absence of clear passing options between the lines made it challenging for City to break down Aston Villa's resilient defense.
As Aston Villa took on Arsenal, some wondered if facing the Gunners was as straightforward as City. The answer? Not at all. Arsenal brought their own challenges, making this encounter a unique tactical puzzle for Aston Villa to solve.
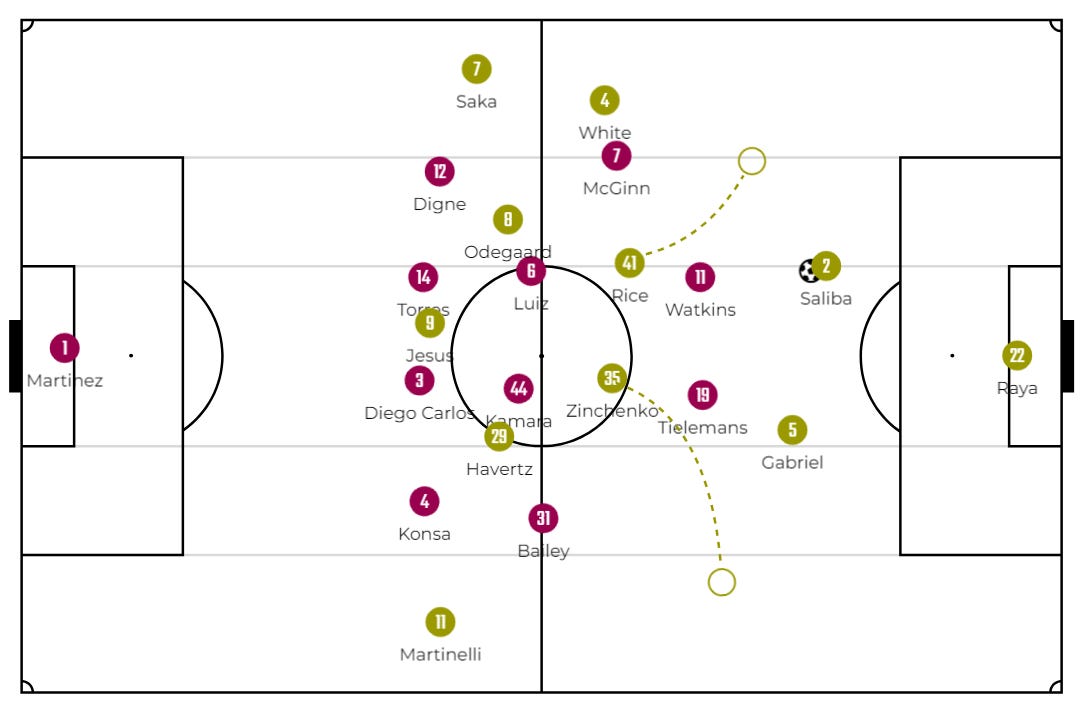
Arsenal has two 6ers, with one of them the inverted LB Zinchenko. In contrast to City, they provide diverse options and employ various movements.
Provoking Aston Villa's forwards and wingers. This approach allows Arsenal players to position themselves freely and receive the ball in between the lines.

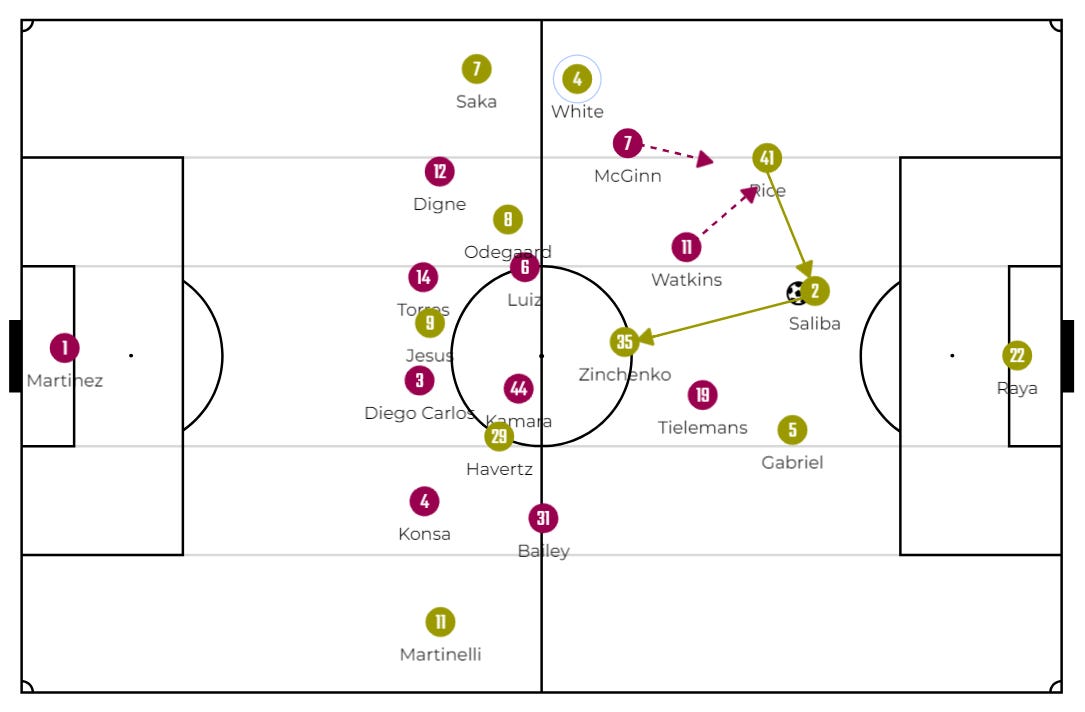
With one of the 6ers dropping deep, Aston Villa's FWs were given the freedom to press. However, this adjustment expanded the space between them and their midfield, leaving the other 6er outside the cover shadow.
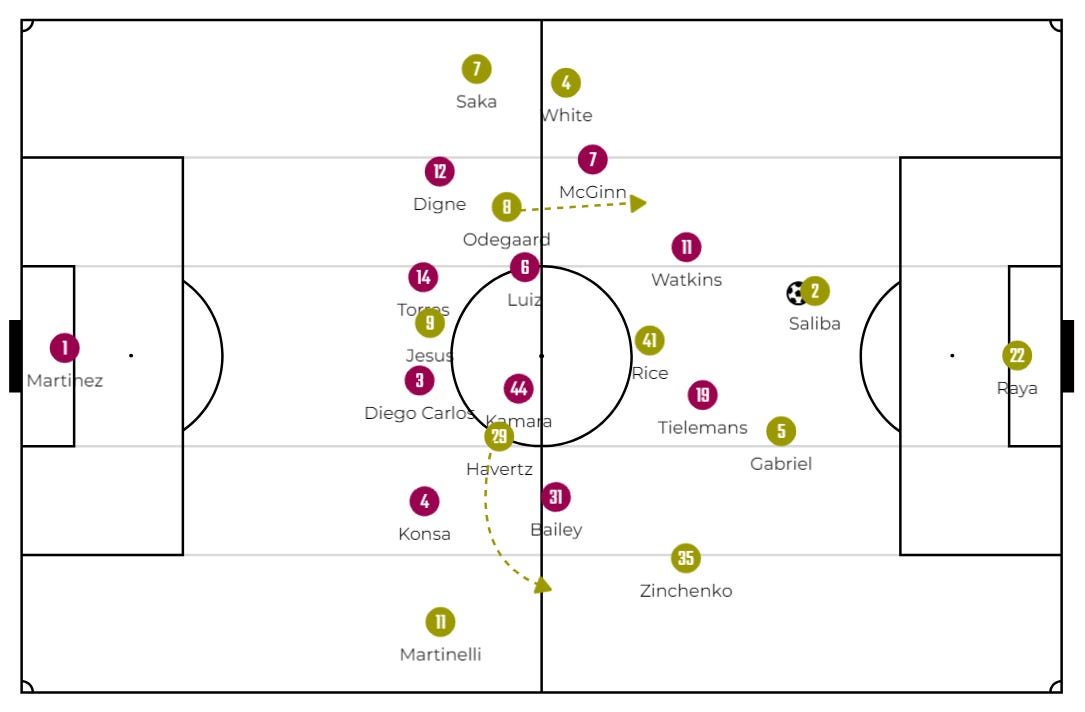
It wasn't just that; the 8ers of Arsenal also had the freedom to move out of their positions. Zinchenko, the left back, occasionally stuck to the wide position in his traditional role, making it more challenging for Aston Villa.
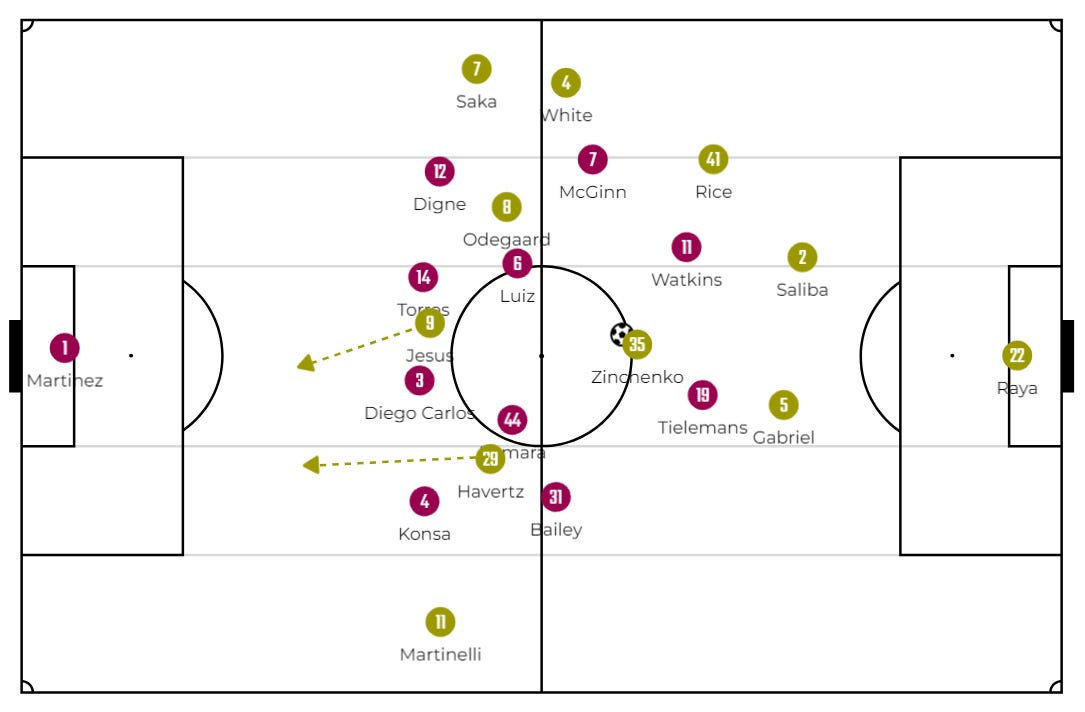
But their true strategy unfolded when the ball reached a player positioned between the lines. Arsenal attempted to exploit the space behind Aston Villa's high defensive line. This aspect remained the pivotal question for Aston Villa, ultimately influencing the outcome of their defensive approach.
Timing and effective communication among defenders are crucial for the successful application of the technique

With two 6ers initially positioned outside, then shifting inside, Arsenal found it relatively easy to locate one of them. The Gunners attacked the defensive line with two players: first, Jesus, who pushed Diego Carlos a bit, followed by Havertz, making a late run into space in behind. This strategy mirrored elements of what Tottenham had employed.
Despite Aston Villa's efforts to prevent such situations, it remains a challenge for Unai Emery to strategize and address this issue. delving into their individual techniques might be a fascinating exploration for later :D
As we wrap up our exploration of Unai Emery's defensive tactics at Aston Villa, it's important to note that we've just touched the tip of the iceberg in understanding his coaching brilliance. Throughout the season, Emery's strategies have unfolded like a captivating puzzle, and while we aimed to shed light on the core methodology, some intricate details were left unexplored for brevity.
In attempting to unravel the mysteries of Emery's footballing mind, we hope to have provided a sneak peek into the strategic world of Aston Villa. Keep an eye out for future analyses where we might dive deeper into the ever-evolving tactics of this fascinating team!